Appearance
Shopify A/B Testing Tutorial: Product Description & CTA
Learn by example: test and optimize your Shopify product page copy—no developer required.
You’ll see how to replace an existing description, add a call to action below it, and finally link both experiments for coherent, high-converting scenarios.
1. Replace the Product Description (No Code Changes)
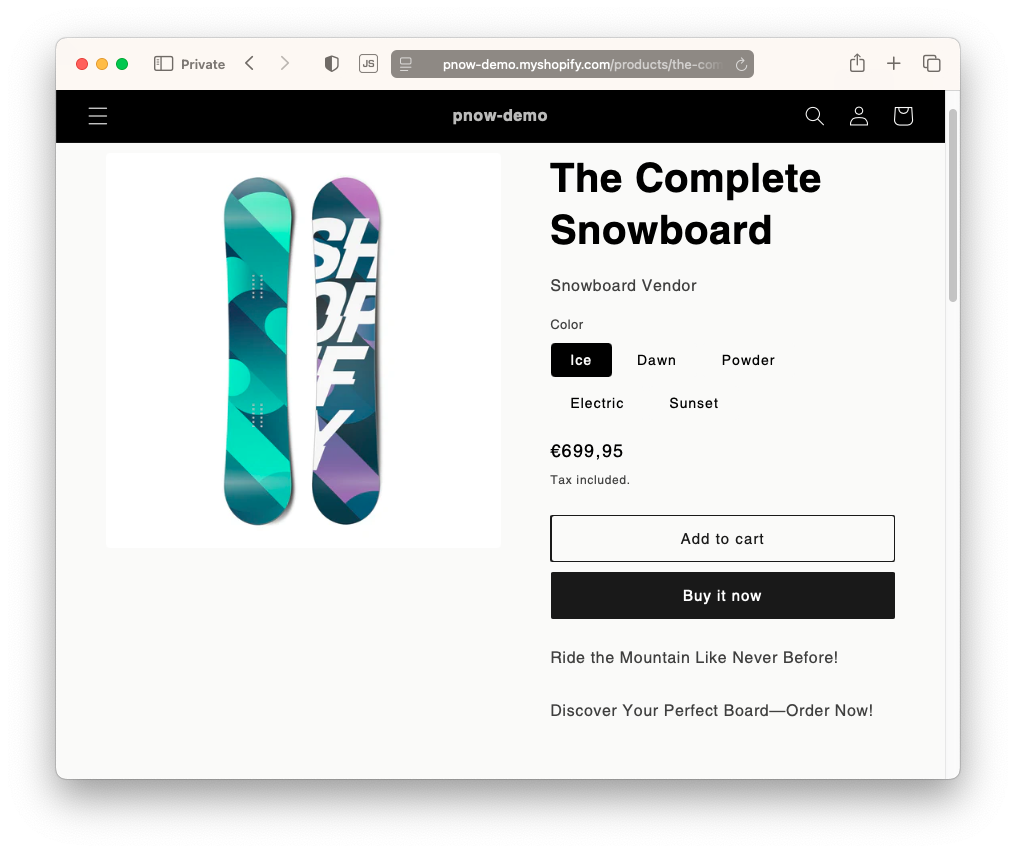
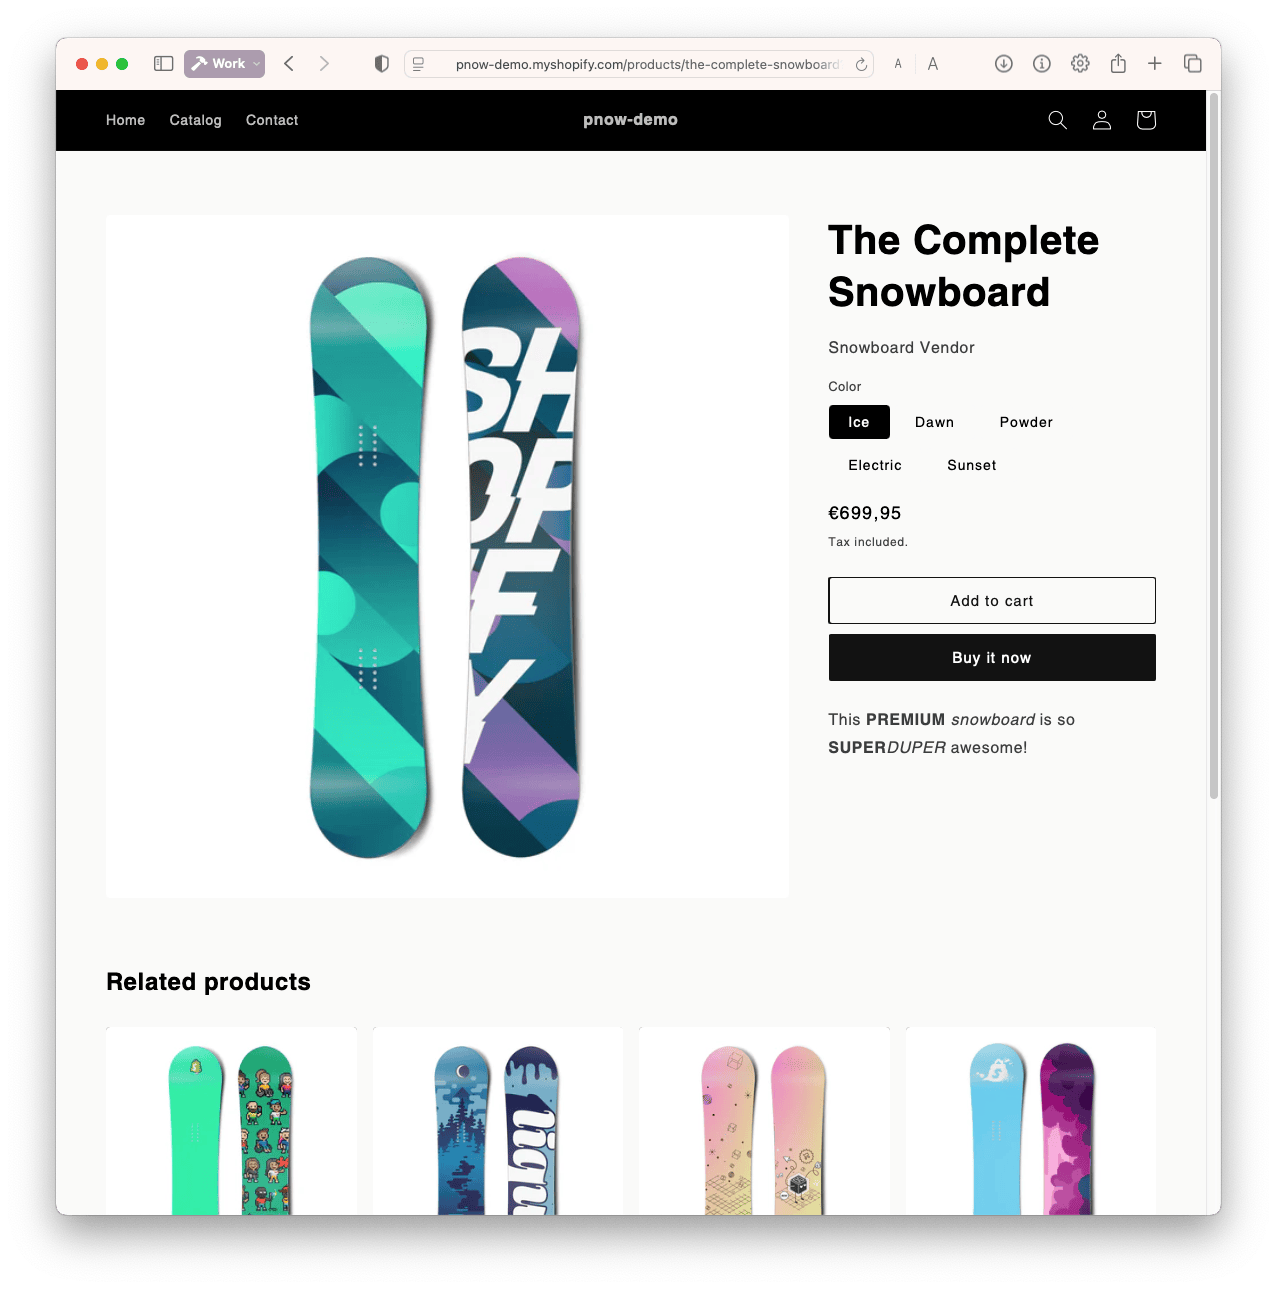 Suppose your product page for “The Complete Snowboard” starts with this uninspiring copy:
“This PREMIUM snowboard is so SUPERDUPER awesome!”
Let’s test better headlines—and see which wins.
Step 1: Find the Selector
You don’t need to touch the site code to replace text, just tag your site correctly.
- Use your browser inspector to find the CSS Query Selector for the product description.
For the Shopify demo site, it’s:#product-info > .product__description
(If you need help, contact support.)
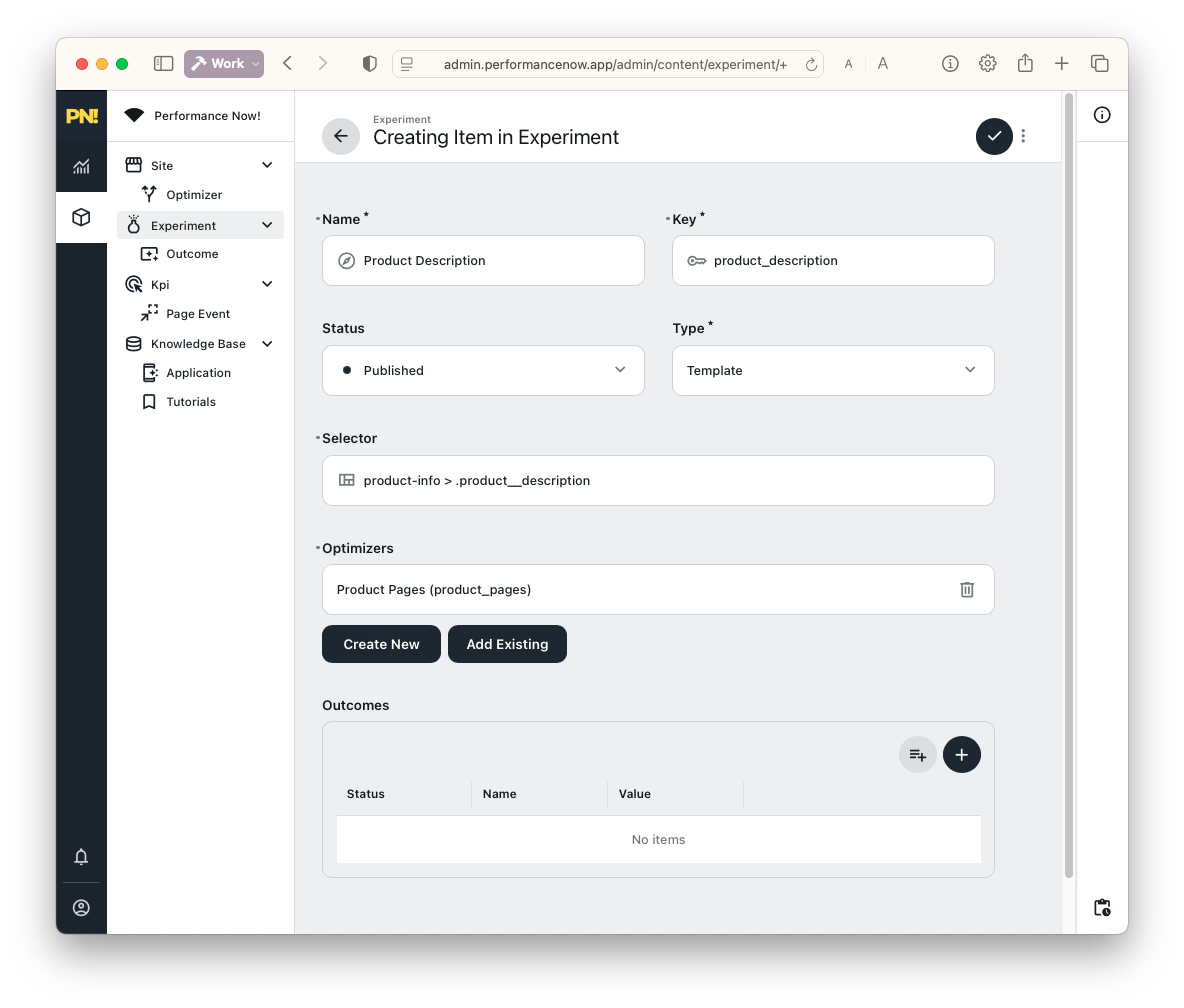
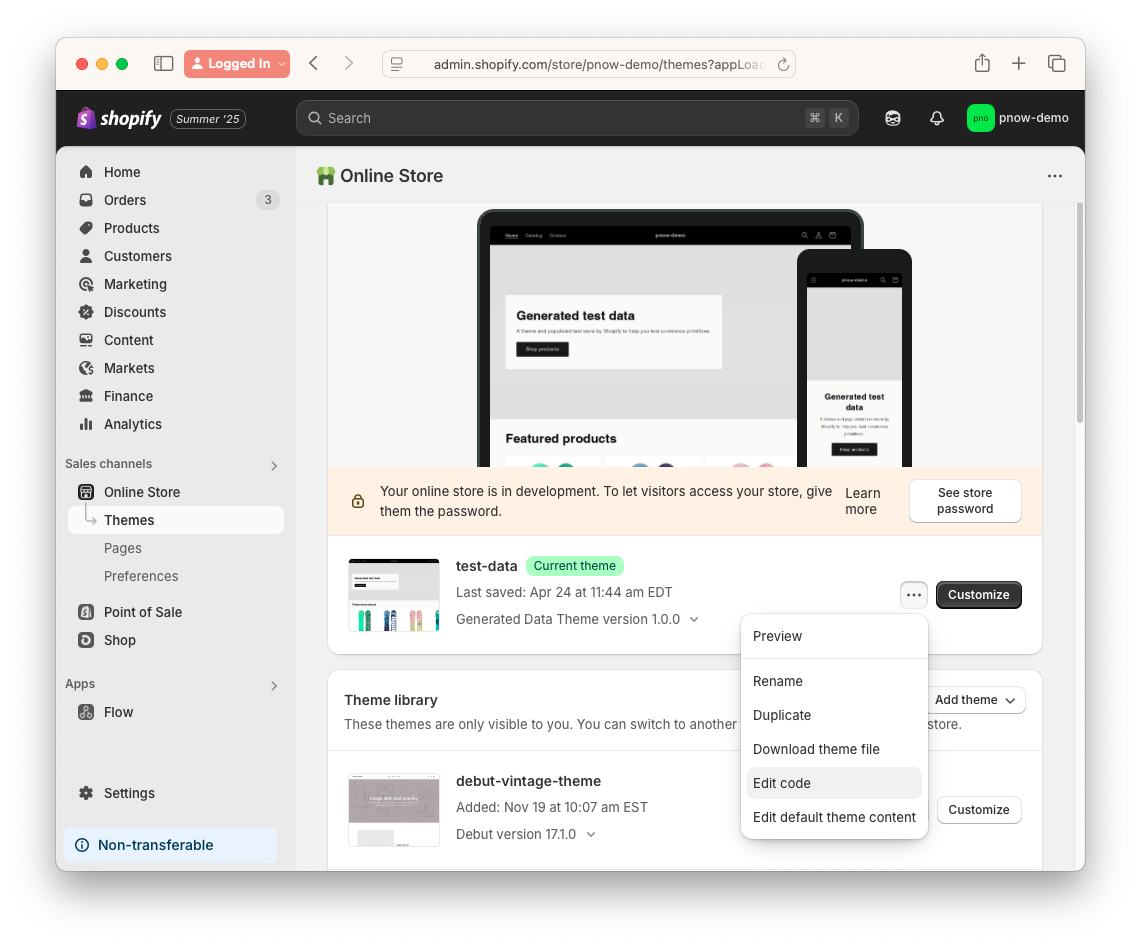
Step 2: Create the Experiment
- In your Performance Now! admin, go to Experiments.
- Click to create a new experiment (you can use your existing Product Page optimizer).
Where do Experiments Appear?
If you add just the product page, the description is replaced only for visitors who arrive via the specific Optimizer link. If you also add “default,” all visitors will see new titles after a few minutes, regardless of source.
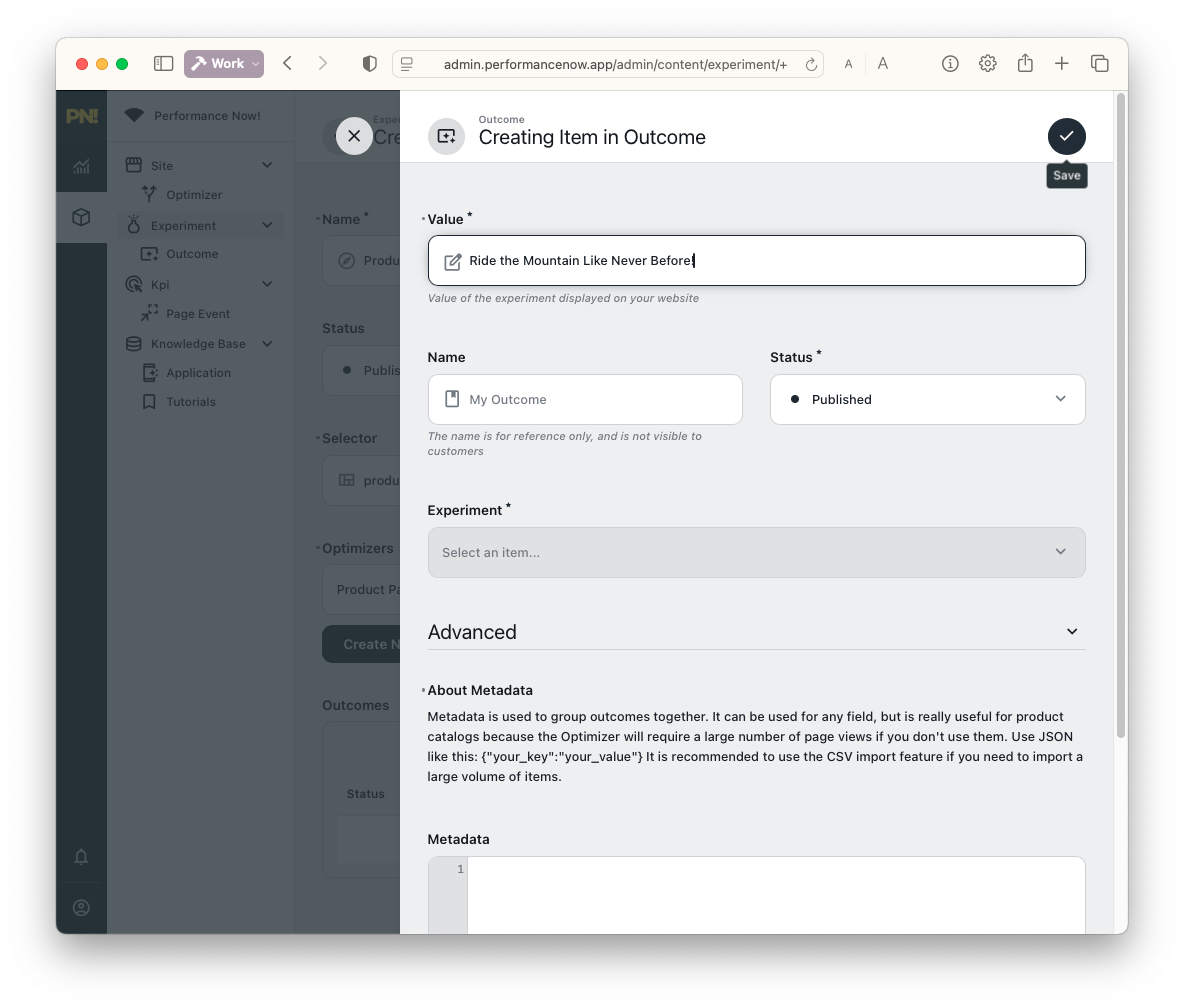
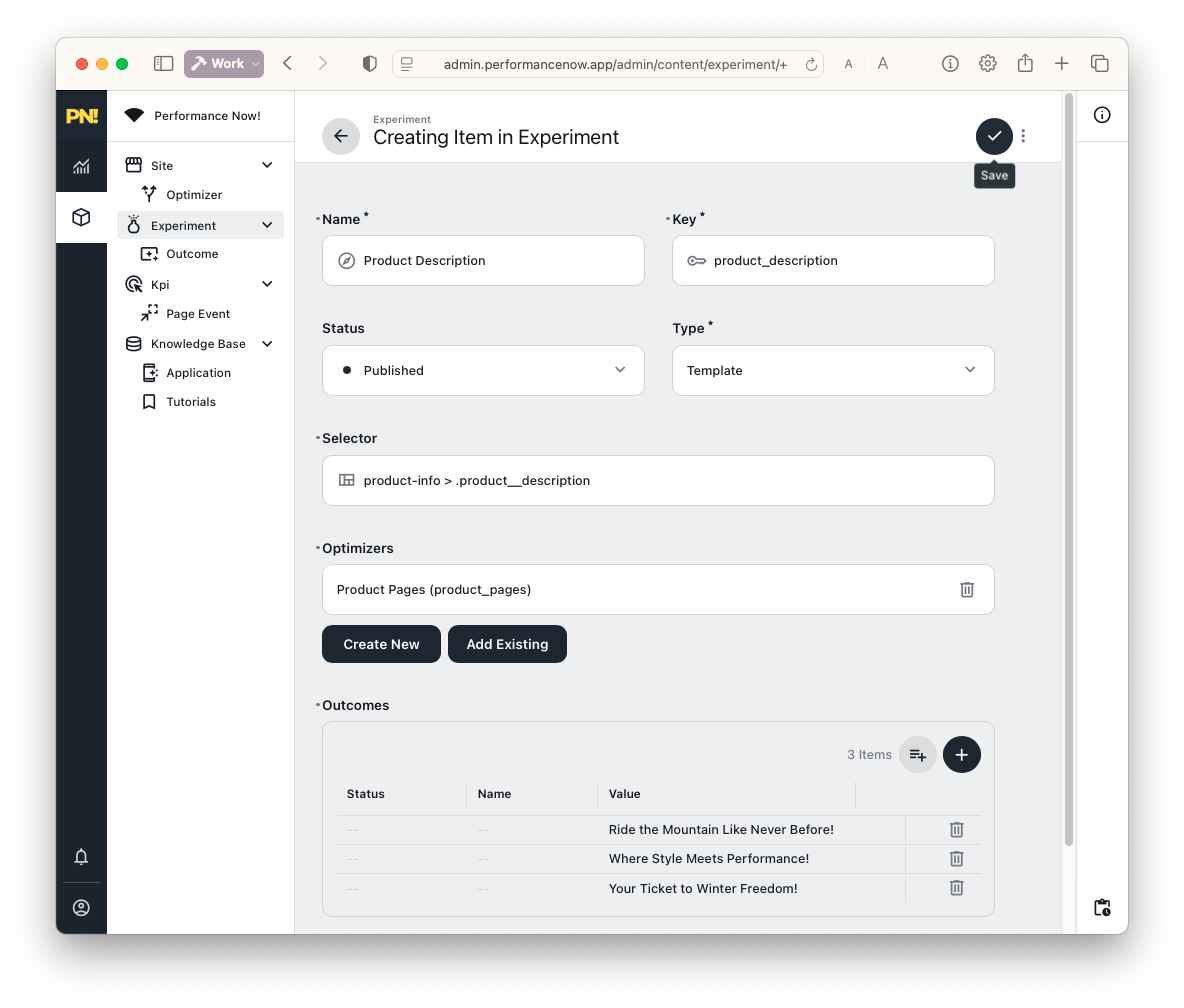
- Enter three test headlines:
- Ride the Mountain Like Never Before!
- Where Style Meets Performance!
- Your Ticket to Winter Freedom!
Click the black "+" button to add each as an outcome.
Step 3: Save and Test
- Save your experiment.
- Open your product page in a new private browsing session.
Note on Private Sessions
Experiments stick to a session for consistent messaging—use a fresh session to see new results.
Safari private tabs are 100% isolated, while Chrome shares state across all incognito windows, so you will need to close all incognito windows and open a new one in Chrome.

2. Add a Call to Action (CTA) Below the Description
What about trying different calls to action just below your product copy?
Let’s add three, then test which one actually converts best.
Step 1: Edit the Theme to Add a CTA Slot
Since the CTA spot doesn’t exist by default, you’ll edit your Shopify theme once.
- Go to your Shopify admin and edit the theme code.
Backup Your Theme before Editing
Before making any changes, always backup your theme. You can do this by duplicating your theme in the Shopify admin. This way, if something goes wrong, you can easily revert to the original version.
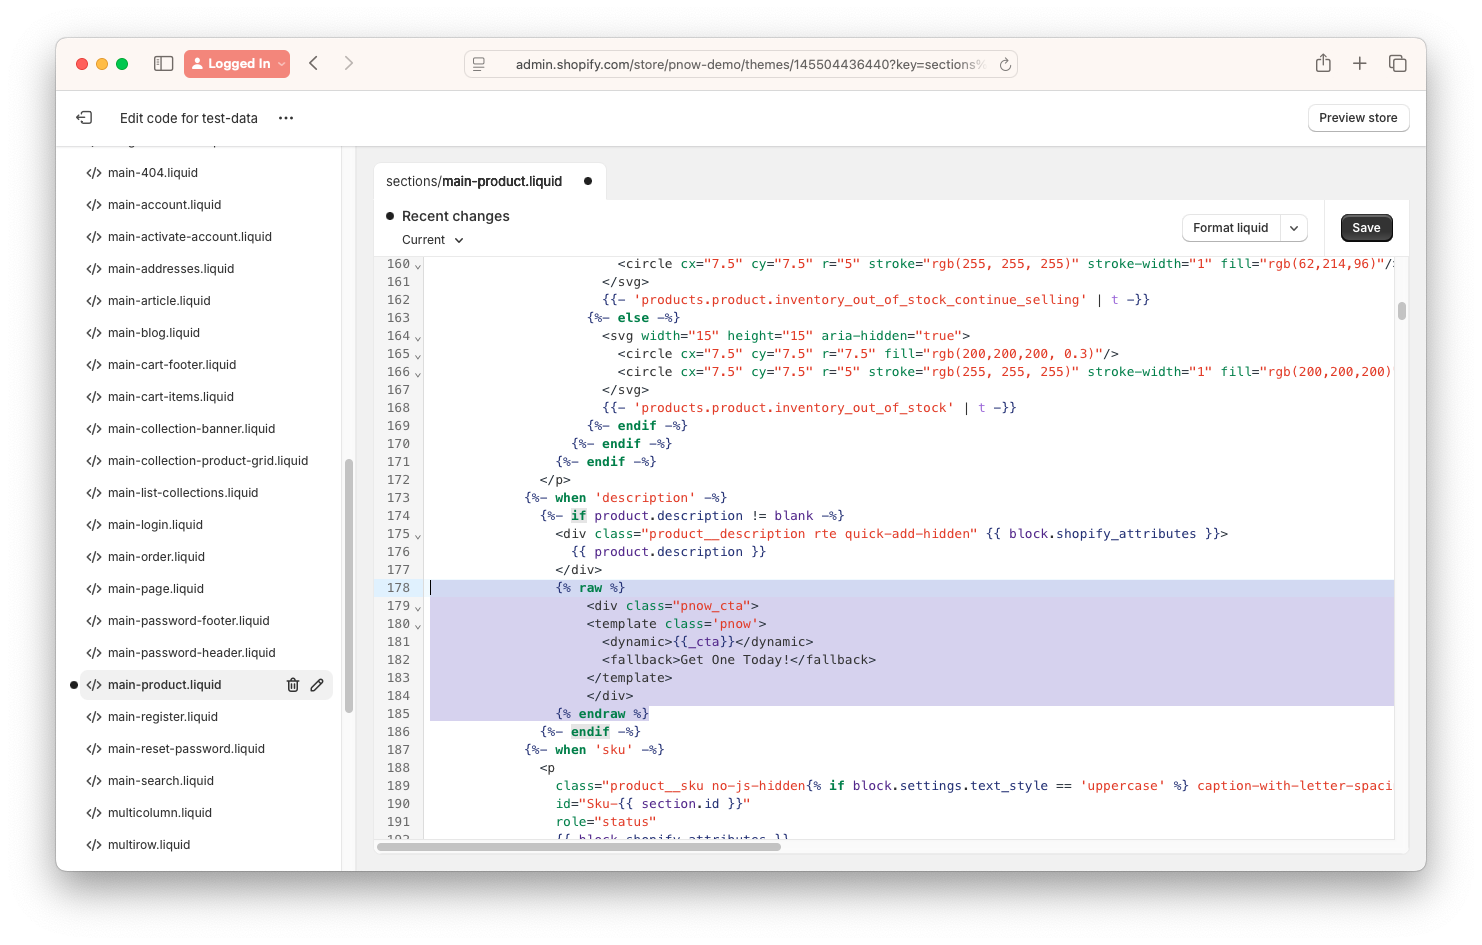
Edit
sections/main-product.liquid.
(Need help finding the right file? Contact support.)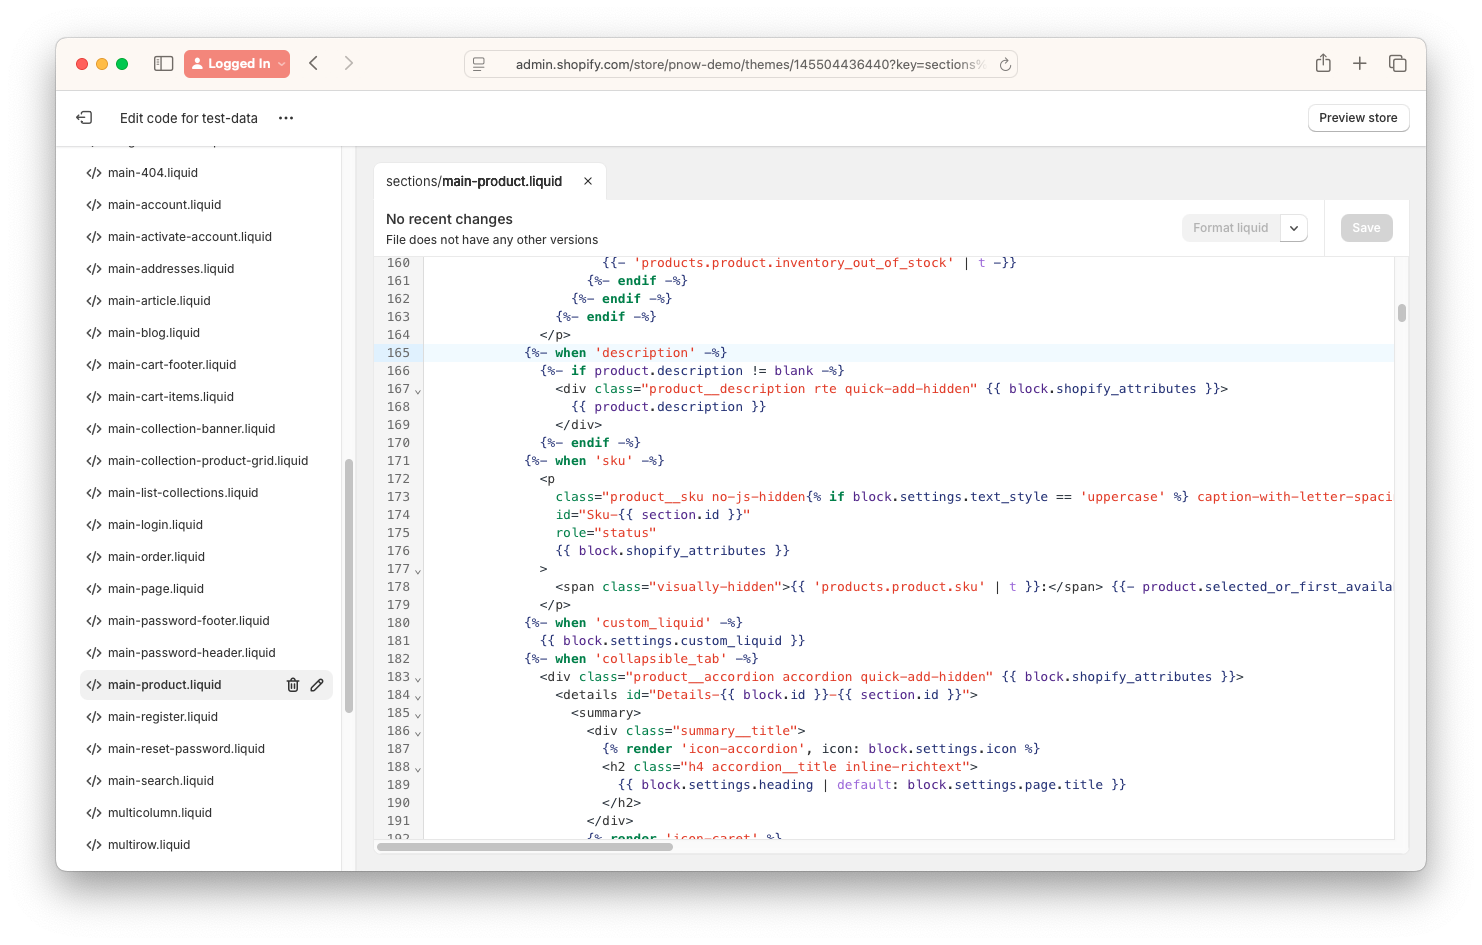
Locate the product description code:
liquid{%- when 'description' -%} {%- if product.description != blank -%} <div class="product__description rte quick-add-hidden" {{ block.shopify_attributes }}> {{ product.description }} </div> {%- endif -%}
Below it, add:
liquid{% raw %} <div class="pnow_cta"> <template class='pnow'> <dynamic>{{product_cta}}</dynamic> <fallback>Get One Today!</fallback> </template> </div> {% endraw %}
Why the {% raw %} and {% endraw %}?
Shopify and Performance Now! both use {{variable}}—this is a standard syntax for templating named "Mustache".
To avoid conflicts, you need to tell Shopify to leave the {{product_cta}} part alone.
This is why you use {% raw %} and {% endraw %}—it tells Shopify to treat everything in between as plain text, not as a variable to replace. It is not needed in other systems like WordPress or custom HTML, except the ones that also use {{ }} syntax.
If you use Vue, you can use the "v-pre" directive instead.
- The
.pnow_ctadiv is entirely optional, but it helps you find the slot later in the inspector, as the template tag gets replaced dynamically by the platform. - Click Save.
Step 2: Test the CTA Fallback
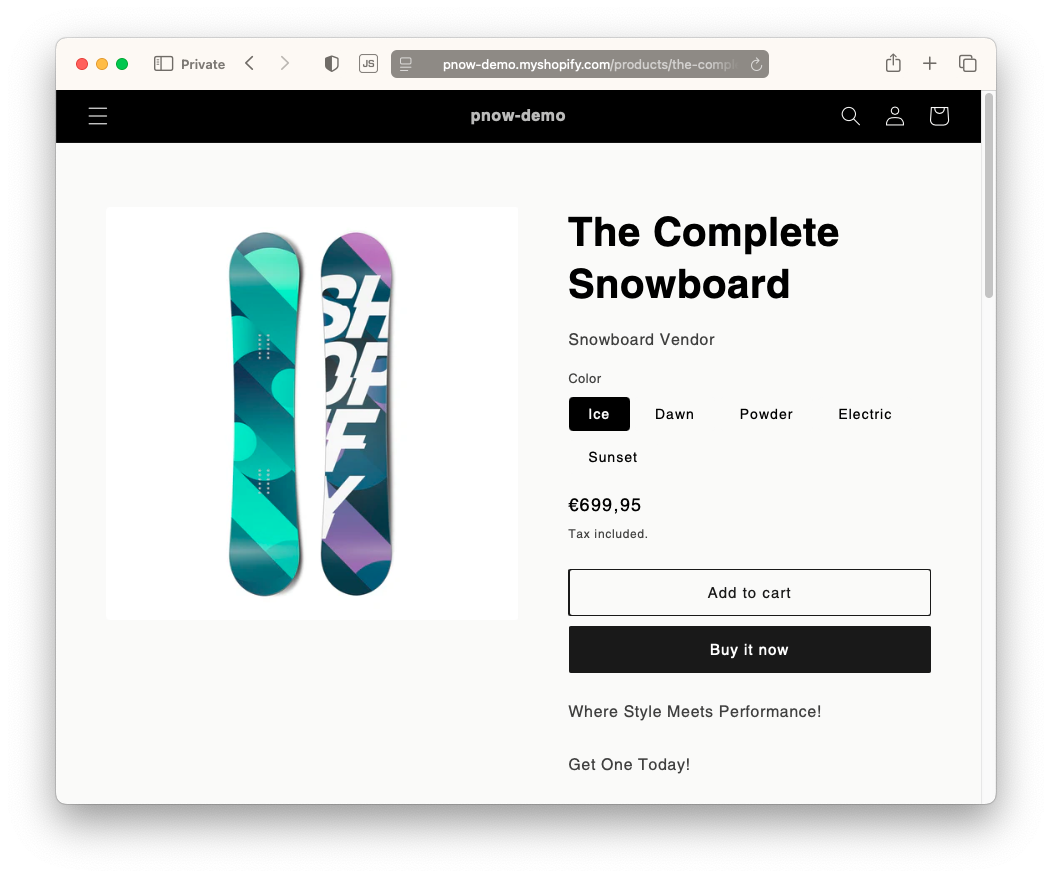
- Refresh your product page.
- You’ll now see “Get One Today!”—this comes from the
<fallback>tag, since you haven’t created the experiment yet.
3. Create the CTA Experiment
In admin, create a new experiment for the CTA slot, with these three outcomes:
- Grab Yours Today and Hit the Slopes!
- Discover Your Perfect Board—Order Now!
- Join the Adventure—Get Yours Today!
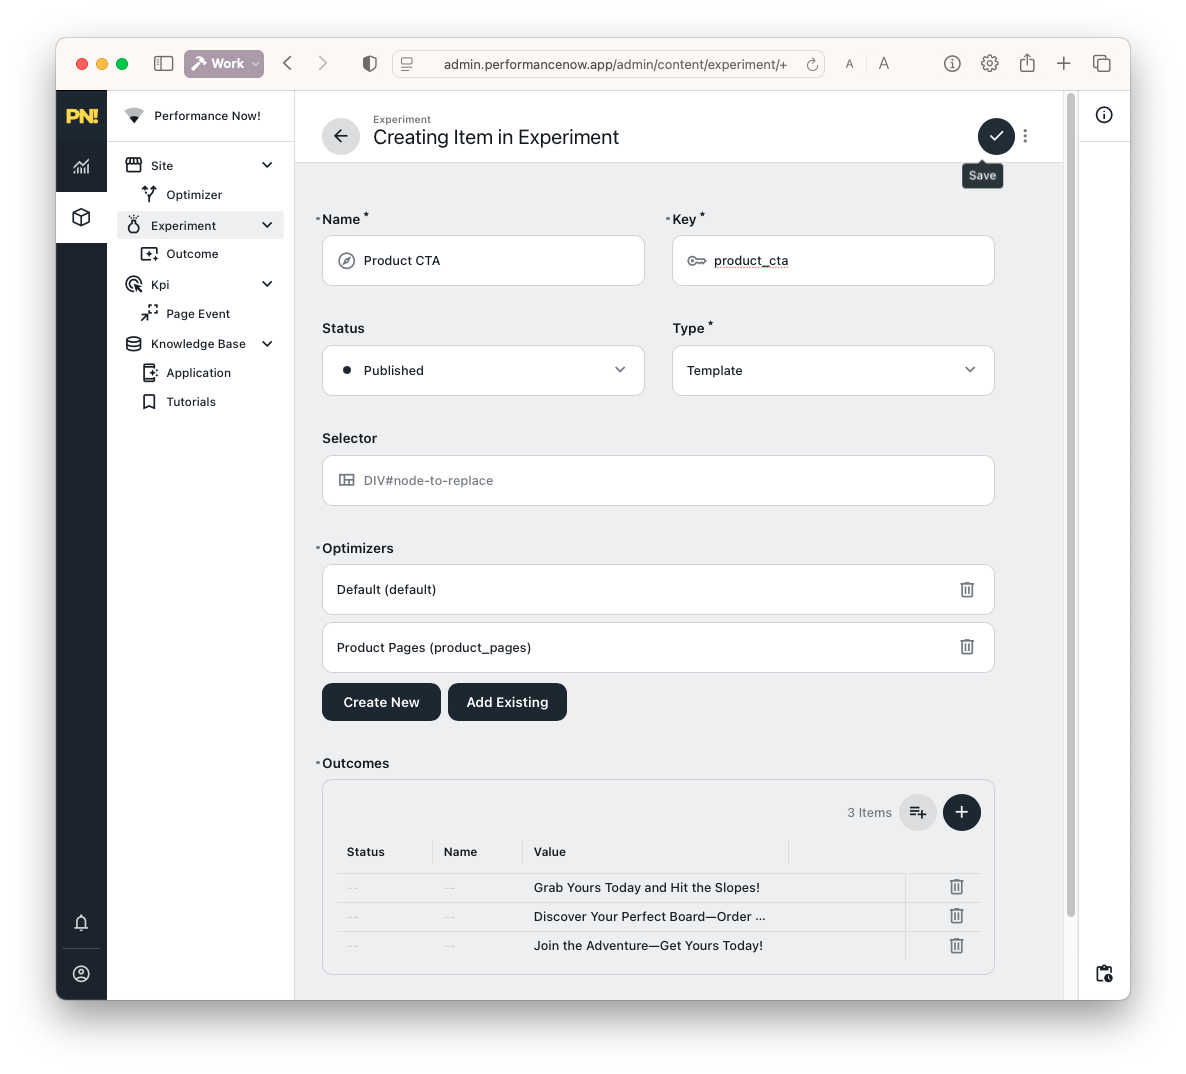
Save.
Open a new private session to test the CTA experiment.
You’ll see the CTA change below the product description, with the description itself remaining unchanged.
4. Link Description and CTA
What if you want the CTA and product description to match? You could promote your product with multiple claims, and each claim could have a different call to action and a different proof point.
This is where linked experiments shine: they allow you to connect outcomes across different experiments, ensuring a consistent user experience.
For example, if your headline is “Ride the Mountain Like Never Before!” you may want the CTA to be something like “Experience the thrill of the slopes!”
Step 1: Link Outcomes via Metadata

- Go back to the Product Description experiment.
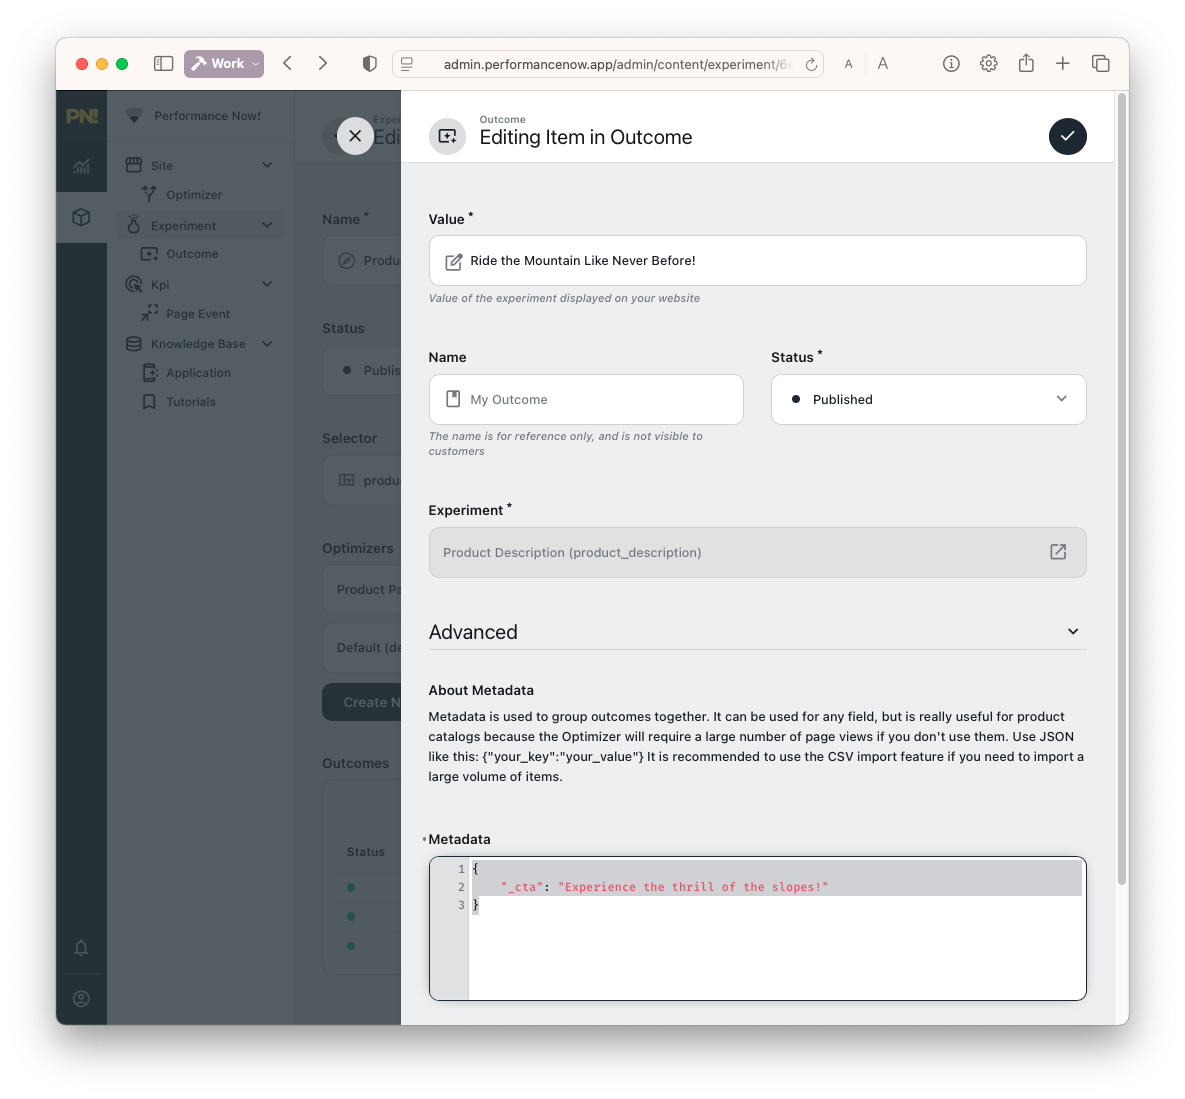
- Change each outcome’s metadata so each headline outcome includes a specific CTA.
Advanced Tip: Public Metadata and Linking
You can link outcomes across different experiments using metadata. Any metadata key starting with _ (like _cta) is public—it can be referenced by experiments on your site. Beware that metadata keys starting with _ are visible to all visitors, so do not use them for sensitive data.
Example:
Ride the Mountain Like Never Before!
Metadata:
json{ "_cta": "Experience the thrill of the slopes!" }
Where Style Meets Performance!
Metadata:
json{ "_cta": "Get ready to carve your path!" }
Your Ticket to Winter Freedom!
Metadata:
json{ "_cta": "Embrace the winter wonderland!" }
Step 2: Update the Theme to Use Metadata
Back in your Shopify theme, update the CTA slot so it references the new metadata key (replace
product_ctawith_cta):liquid{% raw %} <div class="pnow_cta"> <template class='pnow'> <dynamic>{{_cta}}</dynamic> <fallback>Get One Today!</fallback> </template> </div> {% endraw %}Click Save.
Why the Change?
The product_cta variable was a placeholder for the default CTA. Now, it’s replaced with _cta, which pulls the linked metadata from the description experiment. This way, the CTA dynamically matches the headline shown. Please note that the product_cta variable is not used anymore, so you can remove it from the Optimizers if you want to keep your setup clean.
Step 3: See Linked Experiments in Action
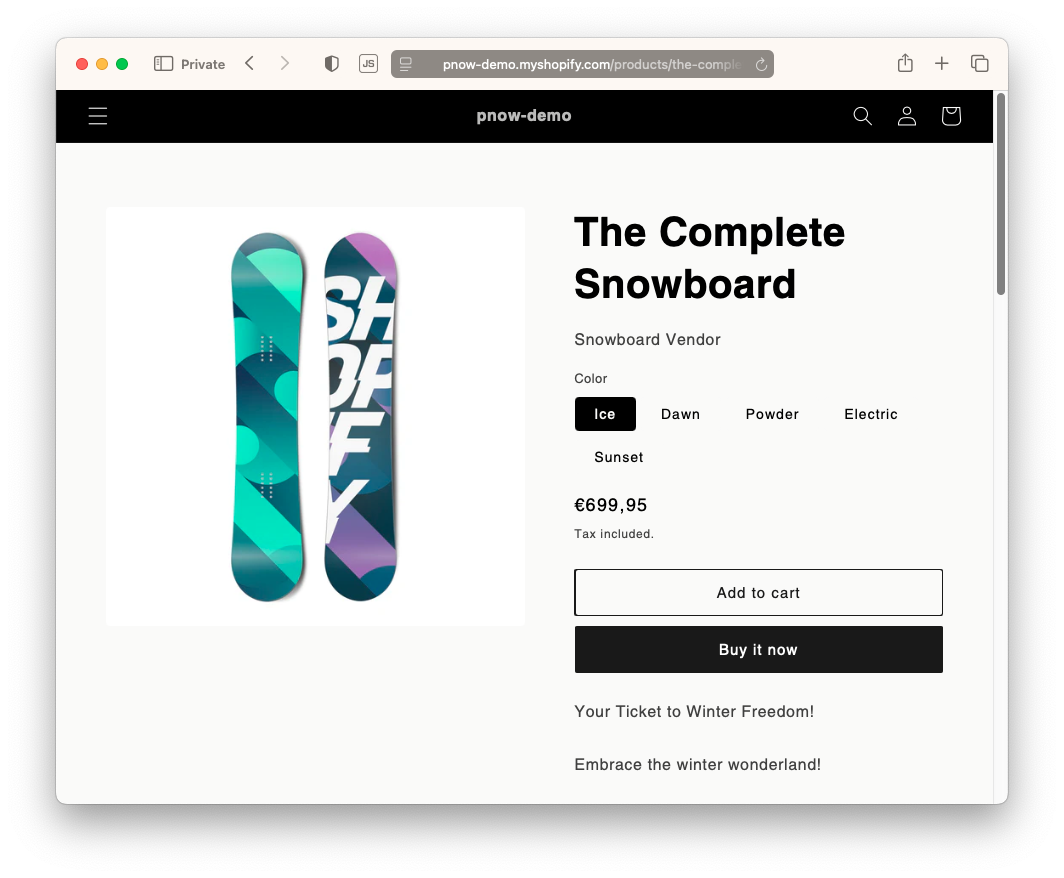
- Open a fresh private session and view the product page.
- Now, each time a headline is shown, its linked CTA appears below—fully coordinated.
You can extend this: Link images, buttons, or other page elements by chaining metadata and experiments.
Once your placeholders are set up, you rarely need to touch the site code again.
Real-World Example
To see multiple chained A/B experiments live, visit our homepage (look for the blue custom CTA box or LinkedIn push box).
Need Help?
If you get stuck or want advice on advanced scenarios, contact support.